Friday, October 23, 2015

LISTAGG Function

SELECT deptno ,LISTAGG(ename, ',') WITHIN GROUP (
ORDER BY ename) AS employees
FROM emp
GROUP BY deptno;

 DEPTNO   EMPLOYEES
--------  ---------------
    10   CLARK,KING,MILLER
    20   ADAMS,FORD,JONES,SCOTT,SMITH,SMITH
    30   ALLEN,ALLEN,BLAKE,JAMES,MARTIN,TURNER,WARD,WARD

Friday, September 18, 2015

Mutating table/trigger error and how to resolve it

A good article on Mutating Table/Trigger and how to avoid this using Compound Triggers. Click Here or continue reading below.

Most of us who have worked in Oracle have encountered ORA-04091 (table xxx is mutating. Trigger/function might not see it) at some time or the other during the development process.  In this blog post, we will cover why this error occurs and how we can resolve it using different methodology.

Mutating error normally occurs when we are performing some DML operations and we are trying to select the affected record from the same trigger. So basically we are trying to select records in the trigger from the table that owns the trigger. This creates inconsistency and Oracle throws a mutating error. Let us take a simple scenario in which we have to know total number of invalid objects after any object status is updated to ‘INVALID’. We will see it with an example. First let us create a table and then trigger.

SQL> CREATE TABLE TEST
2  AS SELECT * FROM USER_OBJECTS;
Table created.
CREATE OR REPLACE TRIGGER TUA_TEST
AFTER UPDATE OF STATUS ON TEST
FOR EACH ROW
DECLARE
v_Count NUMBER;
BEGIN
SELECT count(*)
INTO v_count
FROM TEST
WHERE status = ‘INVALID’;
dbms_output.put_line(‘Total Invalid Objects are ‘ || v_count);
END;
/
Now if we try to change the status of any object to ‘INVALID’, we will run into mutating error as we are trying to update the record and trigger is trying to select total number of records in ‘INVALID’ status from the same table.

SQL> update test
2  set status = 'INVALID'
3  where object_name = 'TEST1';
update test
*
ERROR at line 1:
ORA-04091: table SCOTT.TEST is mutating, trigger/function may not see it

Having said that there are different ways we can handle mutating table errors. Let us start taking one by one scenario.
First one is to create statement level trigger instead of row level. If we omit the ‘for each row’ clause from above trigger, it will become statement level trigger. Let us create a new statement level trigger.

CREATE OR REPLACE TRIGGER TUA_TEST
AFTER UPDATE OF STATUS ON TEST
DECLARE
v_Count NUMBER;
BEGIN
SELECT count(*)
INTO v_count
FROM TEST
WHERE status = ‘INVALID’;
dbms_output.put_line(‘Total Invalid Objects are ‘ || v_count);
END;
Now let us fire the same update statement again.

SQL> UPDATE TEST
2     SET status = 'INVALID'
3   WHERE object_name = 'TEST1';
Total Invalid Objects are 6
1 row updated.
When we defined statement level trigger, update went through fine and it displayed the total number of invalid objects.
Why this is a problem when we are using ‘FOR EACH ROW’ clause? As per Oracle documentation, the session, which issues a triggering statement on the table, cannot query the same table so that trigger cannot see inconsistent data. This restriction applies to all the row level triggers and hence we run into mutating table error.
Second way of dealing with the mutating table issue is to declare row level trigger as an autonomous transaction so that it is not in the same scope of the session issuing DML statement. Following is the row level trigger defined as pragma autonomous transaction.

CREATE OR REPLACE TRIGGER TUA_TEST
AFTER UPDATE OF STATUS ON TEST
FOR EACH ROW
DECLARE
PRAGMA AUTONOMOUS_TRANSACTION;
v_Count NUMBER;
BEGIN
SELECT count(*)
INTO v_count
FROM TEST
WHERE status = ‘INVALID’;
dbms_output.put_line(‘Total Invalid Objects are ‘ || v_count);
END;
Now let is issue the update statement again and observe the results.

SQL> UPDATE TEST
2     SET status = 'INVALID'
3   WHERE object_name = 'TEST1';
Total Invalid Objects are 5
1 row updated.
If you closely look at the output, you will see only 5 objects shown in invalid status while statement level trigger showed 6 objects in invalid status. Let us try to update multiple objects at the same time.

SQL> UPDATE TEST
2     SET status = 'INVALID'
3   WHERE object_name IN ('T1','T2');

Total Invalid Objects are 6
2 rows updated.
By defining row level trigger as an autonomous transaction, we got rid of mutating table error but result is not correct. The latest updates are not getting reflected in our result set as oppose to statement level trigger. So one has to be very careful when using this approach.
In version 11g, Oracle made it much easier with introduction of compound triggers. We have covered compound triggers in a previous blog post. Let us see in this case how a compound trigger can resolve mutating table error. Let’s create a compound trigger first:

CREATE OR REPLACE TRIGGER TEST_TRIG_COMPOUND
FOR UPDATE
ON TEST
COMPOUND TRIGGER
/* Declaration Section*/
v_count NUMBER;
AFTER EACH ROW IS
BEGIN
dbms_output.put_line(‘Update is done’);
END AFTER EACH ROW;
AFTER STATEMENT IS
BEGIN
SELECT count(*)
INTO v_count
FROM TEST
WHERE status = ‘INVALID’;
dbms_output.put_line(‘Total Invalid Objects are ‘ || v_count);
END AFTER STATEMENT;
END TEST_TRIG_COMPOUND;
/
Now let us check how many objects are invalid in the test table.

SQL> select count(*) from test where status = 'INVALID';

COUNT(*)
———-
6
Here is the update statement followed by an output.

SQL> UPDATE TEST
2     SET status = 'INVALID'
3   WHERE object_name = 'T2';

Update is done
Total Invalid Objects are 7
1 row updated.
Here we get correct result without getting mutating table error. This is also one very good advantage of compound triggers. There are other ways also to resolve mutating table error using temporary tables but we have discussed common ones in this blog post.

Tuesday, September 8, 2015

Monday, September 7, 2015

Master-Detail Relationship in Oracle forms Blocks

First create Master data Block , then detail data block.

From HR schema  : Master Data Block is Departments
                           and Detail Data Block is Employees.

Layout Style 'Form' for Departments Block, with 1 record displayed.
Layout Style 'Tabular' for Employees Block, with 5 record displayed.

Setting Relations: ( During Layout Wizard) 


And likely below ON-POPULATE-DETAILS and ON-CHECK-DELETE-MASTER 
triggers gets automatically generated under the master data block.


If we change the Delete Record Behaviour property , the triggers will automatically change 
accordingly.

1. Non-Isolated :( Triggers are automatically generated under the master data block)
a) ON-POPULATE-DETAILS
b) ON-CHECK-DELETE-MASTER

2. Cascading :( Triggers are automatically generated under the master data block)
a) ON-POPULATE-DETAILS
b) PRE-DELETE 

3. Isolated :( Triggers are automatically generated under the master data block)
a) ON-POPULATE-DETAILS


What does the above three properties mean basically ?

Non-Isolated : Prevents deletion of master record if detail record is present.
Cascading : Deletes the detail record once master record is deleted.
Isolated : Only deletes the master record.


Challa.

Tuesday, July 14, 2015

Link between OE_ORDER_HEADERS_ALL and RA_CUSTOMER_TRX_ALL

RA_CUSTOMER_TRX_ALL will have header information

INTERFACE_HEADER_CONTEXT = 'ORDER ENTRY'
INTERFACE_HEADER_ATTRIBUTE1 = ORDER_NUMBER

RA_CUSTOMER_TRX_LINES_ALL will have invoice lines

INTERFACE_LINE_CONTEXT = 'ORDER ENTRY'
INTERFACE_LINE_ATTRIBUTE1 = ORDER_NUMBER
INTERFACE_LINE_ATTRIBUTE6 = OE_ORDER_LINES_ALL.LINE_ID
INTERFACE_LINE_ATTRIBUTE3 = WSH_NEW_DELIVERIES.DELIVERY_ID

Monday, May 4, 2015

API to change the password of an Application User

Use the below code to change the password for all the application users. I have used this to change passwords of all application users who has been created after 01-Jan-2015.

To change password for single user remove the for loop and un-comment the local variables. Amend as per your requirement.

DECLARE
--v_user_name varchar2(30):=upper('&Enter_User_Name');
--v_new_password varchar2(30):='&Enter_New_Password';
   v_status   BOOLEAN;

   CURSOR c1
   IS
      SELECT user_name
        FROM fnd_user
       WHERE TRUNC (creation_date) > '01-Jan-2015';

BEGIN
   FOR i IN c1
   LOOP
      v_status :=
         fnd_user_pkg.changepassword (username         => i.user_name, --v_user_name
                                      newpassword      => 'newpassword' --v_new_password
                                     );

      IF v_status = TRUE
      THEN
         DBMS_OUTPUT.put_line
                          (   'The password reset successfully for the User:'
                           || i.user_name
                          );
         COMMIT;
      ELSE
         DBMS_OUTPUT.put_line (   'Unable to reset password due to'
                               || SQLCODE
                               || ' '
                               || SUBSTR (SQLERRM, 1, 100)
                              );
         ROLLBACK;

      END IF;

   END LOOP;

END;

Thursday, April 9, 2015

How to get Concurrent Program Output file and Log file from Database.

This post will guide you how to get concurrent program log files and output files from database. As you are aware whenever you submit concurrent program , after successful completion of it, Two files will be generated  which are nothing but LOG files and OUTPUT files. We can get those files by calling function  FND_WEBFILE.GET_URL

This function will return output value which is nothing but the  Link for the Log file or Output File , So only thing we need to do is to just paste the link in browser to view Log File or Output file. During this activity you don't need to be login on to the Oracle Application Window

Below code will help you out in Generating Log file , Pass request id  as  input parameter'

SET SERVEROUTPUT ON

DECLARE
   l_request_id   NUMBER          := :p_req_id;             -- The request id
   l_two_task     VARCHAR2 (256);
   l_gwyuid       VARCHAR2 (256);
   l_url          VARCHAR2 (1024);
BEGIN
   -- Get the value of the profile option named, Gateway User ID (GWYUID)
   --- l_gwyuid := fnd_profile.VALUE ('APPLSYSPUB/PUB');
   SELECT profile_option_value
     INTO l_gwyuid
     FROM fnd_profile_options o, fnd_profile_option_values ov
    WHERE profile_option_name = 'GWYUID'
      AND o.application_id = ov.application_id
      AND o.profile_option_id = ov.profile_option_id;

   -- Get the value of the profile option named, Two Task(TWO_TASK)
   SELECT profile_option_value
     INTO l_two_task
     FROM fnd_profile_options o, fnd_profile_option_values ov
    WHERE profile_option_name = 'TWO_TASK'
      AND o.application_id = ov.application_id
      AND o.profile_option_id = ov.profile_option_id;

   l_url :=
      fnd_webfile.get_url
         (file_type        => fnd_webfile.request_log,
                          -- for log file. Use request_out to view output file
          ID               => l_request_id,
          gwyuid           => l_gwyuid,
          two_task         => l_two_task,
          expire_time      => 500                       -- minutes, security!.
         );
   DBMS_OUTPUT.put_line (l_url);
END;

Output will be one link , Just paste the output in Browser and you will be able to view Log file output.


Below code will help you out in Generating Out file for the specific Concurrent request , Pass request id as input parameter

SET SERVEROUTPUT ON

DECLARE
   l_request_id   NUMBER := :P_REQ_ID;                       -- The request id
   l_two_task     VARCHAR2 (256);
   l_gwyuid       VARCHAR2 (256);
   l_url          VARCHAR2 (1024);
BEGIN
   -- Get the value of the profile option named, Gateway User ID (GWYUID)
   --- l_gwyuid := fnd_profile.VALUE ('APPLSYSPUB/PUB');

   SELECT   profile_option_value
     INTO   l_gwyuid
     FROM   fnd_profile_options o, fnd_profile_option_values ov
    WHERE       profile_option_name = 'GWYUID'
            AND o.application_id = ov.application_id
            AND o.profile_option_id = ov.profile_option_id;


   -- Get the value of the profile option named, Two Task(TWO_TASK)

   SELECT   profile_option_value
     INTO   l_two_task
     FROM   fnd_profile_options o, fnd_profile_option_values ov
    WHERE       profile_option_name = 'TWO_TASK'
            AND o.application_id = ov.application_id
            AND o.profile_option_id = ov.profile_option_id;


   l_url :=
      fnd_webfile.get_url (file_type     => fnd_webfile.request_out, -- for out file
                           ID            => l_request_id,
                           gwyuid        => l_gwyuid,
                           two_task      => l_two_task,
                           expire_time   => 500-- minutes, security!.
                           );

   DBMS_OUTPUT.put_line (l_url);
END;

Output will be one link , Just paste the output in Browser and you will be able to view output file .

Sample Api Code For Ar_Receipt_Api_Pub.Apply

DECLARE
   l_return_status   VARCHAR2 (1);
   l_msg_count       NUMBER;
   l_msg_data        VARCHAR2 (240);
   l_count           NUMBER;
   l_msg_data_out    VARCHAR2 (240);
   l_mesg            VARCHAR2 (240);
   p_count           NUMBER;
   l_rec_num         VARCHAR2 (100);
   l_trx_num         VARCHAR2 (100);
BEGIN
   mo_global.set_policy_context ('S', 82);                    -- your org id
   mo_global.init ('AR');
   ar_receipt_api_pub.APPLY
                           (p_api_version           => 1.0,
                            p_init_msg_list         => fnd_api.g_true,
                            p_commit                => fnd_api.g_true,
                            p_validation_level      => fnd_api.g_valid_level_full,
                            p_cash_receipt_id       => 98654,
                                                        ---
                            p_customer_trx_id       => 87654,
                                                         ----
                            p_org_id                => 82,        -->
                            x_return_status         => l_return_status,
                            x_msg_count             => l_msg_count,
                            x_msg_data              => l_msg_data
                           );
   DBMS_OUTPUT.put_line ('Status ' || l_return_status);
   DBMS_OUTPUT.put_line ('Message count ' || l_msg_count);

   IF l_msg_count = 1
   THEN
      DBMS_OUTPUT.put_line ('l_msg_data ' || l_msg_data);
   ELSIF l_msg_count > 1
   THEN
      LOOP
         p_count := p_count + 1;
         l_msg_data := fnd_msg_pub.get (fnd_msg_pub.g_next, fnd_api.g_false);

         IF l_msg_data IS NULL
         THEN
            EXIT;
         END IF;

         DBMS_OUTPUT.put_line ('Message' || p_count || '.' || l_msg_data);
      END LOOP;
   END IF;
END;

Friday, December 19, 2014

ORA-01791: not a SELECTed expression during valeset creation

I have come across this error while i was trying to use a select statement in the table column while creating the Table value set.I used the below sql statement

SELECT DISTINCT XIH.BATCH_NO FROM XXMCNG_IREQ_HEADERS XIH ORDER BY XIH.REQ_DATE;

Cause : There is an incorrect ORDER BY item. The query is a SELECT DISTINCT query with an ORDER BY clause. In this context, all ORDER BY items must be constants, SELECT list expressions, or expressions whose operands are constants or SELECT list expressions.

Action :
Remove the order by clause from the SQL statement.
(or)
create a view with the same query and the call the view in the Table column while creating the Table value set.

Note :
=====
Restrictions on the ORDER BY Clause.The following restrictions apply to the ORDER BY clause:

•If you have specified the DISTINCT operator in the statement,then this clause cannot refer to columns unless they appear in the select list.
•An order_by_clause can contain no more than 255 expressions.
•You cannot order by a LOB, LONG, or LONG RAW column, nested table, or varray.
•If you specify a group_by_clause in the same statement, then this order_by_clause is restricted to the following expressions:

◦Constants
◦Aggregate functions
◦Analytic functions
◦The functions USER, UID, and SYSDATE
◦Expressions identical to those in the group_by_clause
◦Expressions comprising the preceding expressions that evaluate to the same value for all rows in a group.

 Also See : Creating Table Valuesets from backend in Oracle Applications.

Challa.

Wednesday, December 17, 2014

Amount in Words using XML/BI Publisher Tags

I once had a requirement to display the amount(number) to words(letters). And below is the approach i have followed.

We can convert the Amount into Words in two different ways:

1)Using the XML/BI Publisher Tag (Applicable only to R12).
2)Using the function IBY_AMOUNT_IN_WORDS.Get_Amount_In_Words(TOTAL_AMOUNTS1)

1) Using XML/BI Publisher Tag:

a)  

--> CASE_INIT_CAP, CASE_UPPER, and CASE_LOWER are available to display the text  in Initial Caps,Upper Case,Lower Case respectively.
--> DECIMAL_STYLE_FRACTION1(default), DECIMAL_STYLE_FRACTION2, and DECIMAL_STYLE_WORDS are available.
--> USD in the above tag can be replaced by the curreny code required as per the requirement.

b)  
[ Sorry, there was a problem writing the tag in my browser,so i have taken a snapshot of it and pasted here. ]

2)  Using IBY_AMOUNT_IN_WORDS.Get_Amount_In_Words(TOTAL_AMOUNTS1)

 Example :
declare
v1 VARCHAr2(2000);
begin
v1:=IBY_AMOUNT_IN_WORDS.Get_Amount_In_Words(p_amount =>101324546014);
dbms_output.put_line('amount: '||v1);
end; 

If you expect the Amount in Words to show as shown below

--> One Thousand Pounds and 14 Pence.
 --> One Hundred Euros and 1 Cent.
--> 1 Dollar and 99 Cents.
  
Refer the Oracle Document for setting the currency unit and sub_unit in the system. Click ME.

Challa. 

Friday, November 28, 2014

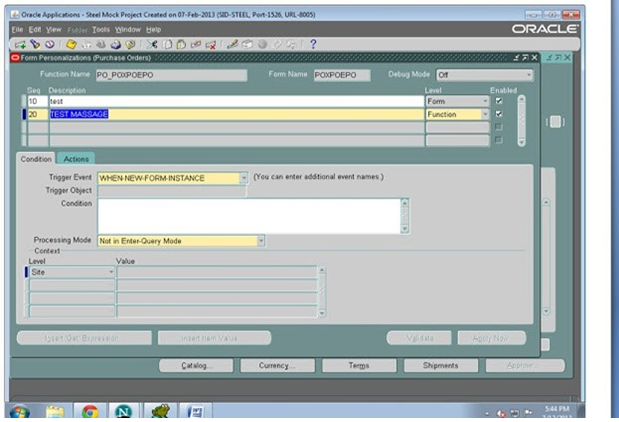
Display Message from FND_MESSAGES using Forms Personalization.

Responsibility: Application Developer
Navigation: Application > Messages


Create new message
Name: XX_TEST
Current Text Message: This is a test message for &USER_NAME


Save and close form.
Generate the message
Responsibility: Application Developer
Click on View > Requests in the menu to execute a concurrent program. Select Generate Messages program.


Click on Help > Diagnostics > Custom Code > Personalize
Create a new Personalization


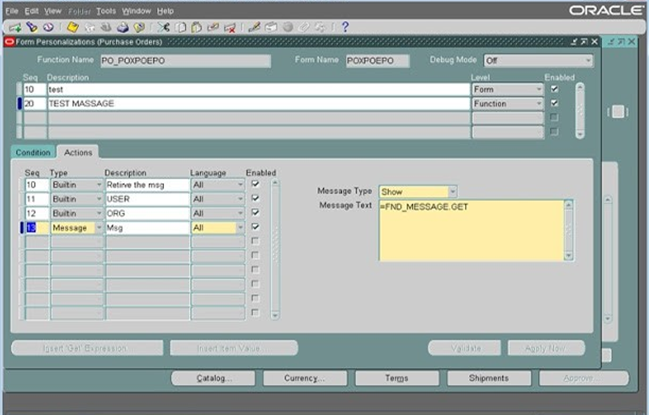
Click on Actions

Sequence 10
Type: Builtin
Description: Retrieve the msg
Builtin Type: Execute a procedure
Argument: FND_MESSAGE.SET_NAME(‘XXCUST’, ‘XX_TEST’)


Sequence 11

Type: Builtin
Description: Set the USER token
Builtin Type: Execute a Procedure
Argument: fnd_message.set_token (‘USERNAME’, fnd_profile.value(‘USERNAME’))


Sequence 12

Type: Builtin
Description: Set the ORG token
Builtin Type: Execute a Procedure
Argument: fnd_message.set_token (‘ORG_ID’, fnd_profile.value(‘ORG_ID’))


Sequence 13
Type: Message
Description: Display the msg
Message Type: Show
Message Text: =FND_MESSAGE.GET


Challa.

Thursday, November 27, 2014

To Get the XML file or Request Output file for XML Reports Concurrent Requests.

Get the XML File from a BI Publisher based concurrent request/report:


Get the XML File from a BI Publisher based concurrent request/report:

1.View->Requests
2.Find the request you're interested in
3.Click on Diagnostics button
4.Click the View XML
5.Save the file to your PC by doing File->Save As, *.xml

But where does the XML file get stored.?

Well, by default it is $APPLCSF/$APPLOUT/o{REQUEST_ID}.out.

But if that's the XML file, then where does the actual output file reside as the location of the XML file is where normal request output resides?
Get the Request Output File for a BI Publisher based concurrent request/report:

The output is $APPLCSF/$APPLOUT/{REPORTNAME}_{REQUEST_ID}_{COUNT}.PDF|RTF|EXCEL|HTML

Where

>  REPORTNAME is the concurrent program short name,
>  REQUEST_ID is the concurrent request ID
>  COUNT is a counter based on the number of times a request has been re-published.
>  One of PDF, RTF, EXCEL, HTML is the file extension/type dependent on the output formats chosen.

An example is: XXXX_FNDSCURS_2803880_1.EXCEL

Output file location courtesy of Tim's post here.

Cool, file locations identified..!!


Challa.

FNDLOAD

LDT is a file extension for a data file used with Oracle applications. LDT stands for Loader DaTa files. LDT files contain entity definitions, parent-child relationships, input parameters and data. LDT files to an LCT file which is used for the configuration. LDT files can be exported from the Oracle database using the FNDLOAD function.

LDT files can be opened and edited in a text editor, although doing so is not recommended.

Printer Styles : 
FNDLOAD apps/pwd@database 0 Y DOWNLOAD $FND_TOP/patch/115/import/afcppstl.lct XX_FILE_NAME.ldt STYLE PRINTER_STYLE_NAME="printer style name"

Lookups: 
FNDLOAD apps/pwd@database 0 Y DOWNLOAD $FND_TOP/patch/115/import/aflvmlu.lct XX_FILE_NAME.ldt FND_LOOKUP_TYPE APPLICATION_SHORT_NAME="prod" LOOKUP_TYPE="lookup name"

Descriptive Flexfield with all of specific Contexts:
FNDLOAD apps/pwd@database 0 Y DOWNLOAD $FND_TOP/patch/115/import/afffload.lct XX_FILE_NAME.ldt DESC_FLEX P_LEVEL=:COL_ALL:REF_ALL:CTX_ONE:SEG_ALL? APPLICATION_SHORT_NAME="prod" DESCRIPTIVE_FLEXFIELD_NAME="desc flex name" P_CONTEXT_CODE="context name"

Multiple Flexfields:

Use a combination of APPLICATION_SHORT_NAME and DESCRIPTIVE_FLEXFIELD_NAME names

ie. APPLICATION_SHORT_NAME=PER >> will download all PER flexfields
DESCRIPTIVE_FLEXFIELD_NAME=PER_% >> will download all flexfields that start with ‘PER_’.

FNDLOAD apps/apps O Y DOWNLOAD $FND_TOP/patch/115/import/afffload.lct XX_FILE_NAME.ldt DESC_FLEX DESCRIPTIVE_FLEXFIELD_NAME="PER_%"

Key Flexfield Structures:
FNDLOAD apps/pwd@database 0 Y DOWNLOAD $FND_TOP/patch/115/import/afffload.lct XX_FILE_NAME.ldt KEY_FLEX P_LEVEL=:COL_ALL:FQL_ALL:SQL_ALL:STR_ONE:WFP_ALL:SHA_ALL:CVR_ALL:SEG_ALL? APPLICATION_SHORT_NAME="prod" ID_FLEX_CODE="key flex code" P_STRUCTURE_CODE="structure name"

Concurrent Programs: 
FNDLOAD apps/pwd@database 0 Y DOWNLOAD $FND_TOP/patch/115/import/afcpprog.lct XX_FILE_NAME.ldt PROGRAM APPLICATION_SHORT_NAME="prod" CONCURRENT_PROGRAM_NAME="concurrent name"

Value Sets:
FNDLOAD apps/pwd@database 0 Y DOWNLOAD $FND_TOP/patch/115/import/afffload.lct XX_FILE_NAME.ldt VALUE_SET FLEX_VALUE_SET_NAME="value set name"

Value Sets with values:
FNDLOAD apps/pwd@database 0 Y DOWNLOAD $FND_TOP/patch/115/import/afffload.lct XX_FILE_NAME.ldt VALUE_SET_VALUE FLEX_VALUE_SET_NAME="value set name"

Profile Options:
FNDLOAD apps/pwd@database 0 Y DOWNLOAD $FND_TOP/patch/115/import/afscprof.lct XX_FILE_NAME.ldt PROFILE PROXX_FILE_NAME="profile option"
APPLICATION_SHORT_NAME="prod"

Request Group:
FNDLOAD apps/pwd@database 0 Y DOWNLOAD $FND_TOP/patch/115/import/afcpreqg.lct XX_FILE_NAME.ldt REQUEST_GROUP REQUEST_GROUP_NAME="request group" APPLICATION_SHORT_NAME="prod"

Request Sets:
FNDLOAD apps/pwd@database 0 Y DOWNLOAD $FND_TOP/patch/115/import/afcprset.lct XX_FILE_NAME.ldt REQ_SET APPLICATION_SHORT_NAME="prod" REQUEST_SET_NAME="request set"

DOWNLOAD:
-- Request set Def --
FNDLOAD apps/$apps_pwd 0 Y DOWNLOAD $FND_TOP/patch/115/import/afcprset.lct REQ_SET REQUEST_SET_NAME=

-- Request set link --
FNDLOAD apps/$apps_pwd 0 Y DOWNLOAD $FND_TOP/patch/115/import/afcprset.lct REQ_SET_LINKS REQUEST_SET_NAME=

UPLOAD :
FNDLOAD apps/$CLIENT_APPS_PWD 0 Y UPLOAD $FND_TOP/patch/115/import/afcprset.lct

FNDLOAD apps/$CLIENT_APPS_PWD 0 Y UPLOAD $FND_TOP/patch/115/import/afcprset.lct

Responsibilities:
FNDLOAD apps/pwd@database 0 Y DOWNLOAD $FND_TOP/patch/115/import/afscursp.lct XX_FILE_NAME.ldt FND_RESPONSIBILITY RESP_KEY="responsibility"

Responsibilities with all Security Groups:
FNDLOAD apps/ 0 Y DOWNLOAD FND_TOP/patch/115/import/afscursp.lct .ldt
FND_USER USER_NAME="" SECURITY_GROUP=% DATA_GROUP_NAME=%

Notes for using FNDLOAD against FND_USER :-

1. After uploading using FNDLOAD, user will be promoted to change their password again during their next sign-on attempt.

2. All the responsibilities will be extracted by FNDLOAD along with User Definition in FND_USER

3. In the Target Environment , make sure that you have done FNDLOAD for new responsibilities prior to running FNDLOAD on users.

Menus:
FNDLOAD apps/ pwd@database 0 Y DOWNLOAD $FND_TOP/patch/115/import/afsload.lct XX_FILE_NAME.ldt MENU MENU_NAME="menu_name"

Forms/Functions/Personalizations:
FNDLOAD / 0 Y DOWNLOAD FND_TOP/patch/115/import/affrmcus.lct FND_FORM_CUSTOM_RULES form_name=
OR

FNDLOAD / 0 Y DOWNLOAD $FND_TOP/patch/115/import/afsload.lct XX_FILE_NAME.ldt FUNCTION FUNCTION_NAME=
OR

FNDLOAD / 0 Y DOWNLOAD $FND_TOP/patch/115/import/afsload.lct XX_FILE_NAME.ldt FORM FORM_NAME=

OR

FNDLOAD / 0 Y DOWNLOAD $FND_TOP/patch/115/import/affrmcus.lct FND_FORM_CUSTOM_RULES function_name=

User/Responsibilities:
FNDLOAD apps/ pwd@database 0 Y DOWNLOAD $FND_TOP/patch/115/import/afscursp.lct XX_FILE_NAME.ldt FND_USER

Alert:
FNDLOAD apps/pwd 0 Y DOWNLOAD $ALR_TOP/patch/115/import/alr.lct my_file.ldt ALR_ALERTS APPLICATION_SHORT_NAME=FND ALERT_NAME=Alert name to download

Blob:
With Release 12.1.1, FNDLOAD supports BLOB data (upload / download ) to better serve content-rich applications.

FNDLOAD apps/pwd 0 Y mode configfile datafile entity [ param ... ]

Overwrite custom definitions:
FNDLOAD apps/apps 0 Y UPLOAD $FND_TOP/patch/115/import/.lct $XX_TOP/import/.ldt CUSTOM_MODE=FORCE

Load an NLS Language:
FNDLOAD / 0 Y UPLOAD \
- UPLOAD_MODE=NLS CUSTOM_MODE=FORCE WARNINGS=TRUE

Migrate the role registration process from one instance to another:

a. Please navigate to the path: $FND_TOP /patch/115/import/US/umxrgsvc.ldt
b. The following command can be used to download:

FNDLOAD apps/@(instance name) O Y DOWNLOAD $FND_TOP/patch/115/import/umxrgsvc.lct umxrgsvc.ldt UMX_REG_SERVICES REG_SERVICE_CODE UMX

c. The following command can be used to upload:

FNDLOAD apps/@(instance name) O Y UPLOAD $FND_TOP/patch/115/import/umxrgsvc.lct umxrgsvc.ldt UMX_REG_SERVICES REG_SERVICE_CODE UMX

Transfer Custom Messages to another Instance:

a. Download the message from the source instance.

FNDLOAD apps/apps 0 Y DOWNLOAD @FND:patch/115/import/afmdmsg.lct password.ldt FND_NEW_MESSAGES APPLICATION_SHORT_NAME=FND MESSAGE_NAME=PASSWORD-INVALID-NO-SPEC-CHAR

b. Move the custom LDT file (password.ldt) over to the destination instance.

c. Upload the custom message to the destination instance.

FNDLOAD apps/apps 0 Y UPLOAD @FND:patch/115/import/afmdmsg.lct password.ldt FND_NEW_MESSAGES APPLICATION_SHORT_NAME=FND CUSTOM_MODE=FORCE

Download UMX Roles and Role Assignment data from one instance and upload to another:

To download from one instance:

FNDLOAD 0 Y DOWNLOAD $FND_TOP/patch/115/import/afrole.lct
umxroles.ldt WF_ROLE ORIG_SYSTEM=UMX%

To upload to another instance:
FNDLOAD 0 Y UPLOAD $FND_TOP/patch/115/import/afrole.lct
umxroles.ldt

Notes:

1.Give special attention when downloading Menus or Responsibilities. In the case for several developers modifying Responsibilities and Menus, then be very careful. Not being careful will mean that untested Forms, Functions, and Menus will become available in the clients Production environment besides the tested Forms, Functions, and Menus.

2.Be very careful when downloading flexfields that reference value sets with independent values for GL Segment Codes. By doing so, downloading and extracting all the test data in GL Codes that might not be applicable for production.

3.There are several variations possible for FNDLOAD. For example, restricting the download and upload to specific segments within Descriptive Flexfields.

4.FNDLOAD is very reliable and stable, if used properly.

5.Please test the FNDLOAD properly, so as to ensure that no unexpected data occurs.

6.As the name suggests, FNDLOAD is useful for FND related objects. However, in any implementation, its required to migrate the Setups in Financials and Oracle HRMS from one environment to another. Oracle iSetup can be used for this. Some of the things that can be migrated using Oracle iSetup are GL Set of Books, HR Organization Structures, HRMS Employees, Profile Options Setup, Suppliers, Customers, Tax Codes & Tax Rates, Financials Setup, Accounting Calendars, Chart of Accounts, GL Currencies.

XML DATA DEFINITION:

DOWNLOAD
FNDLOAD apps/$CLIENT_APPS_PWD O Y DOWNLOAD $XDO_TOP/patch/115/import/xdotmpl.lct XDO_DS_DEFINITIONS APPLICATION_SHORT_NAME=DATA_SOURCE_CODE= TMPL_APP_SHORT_NAME=

UPLOAD
FNDLOAD apps/$CLIENT_APPS_PWD O Y UPLOAD $XDO_TOP/patch/115/import/xdotmpl.lct

The Above command downloads all the templates defined for this Particular Data Definition. For a particular template to be downloaded use

FNDLOAD apps/apps 0 Y DOWNLOAD $XDO_TOP/patch/115/import/xdotmpl.lct XDO_DS_DEFINITIONS APPLICATION_SHORT_NAME=DATA_SOURCE_CODE= TMPL_APP_SHORT_NAME==

ALERTS:

DOWNLOAD 
$FND_TOP/bin/FNDLOAD apps/coco 0 Y DOWNLOAD $ALR_TOP/patch/115/import/alr.lct ALR_ALERTS APPLICATION_SHORT_NAME=< application short name> ALERT_NAME=

UPLOAD
FNDLOAD apps/coco 0 Y UPLOAD $ALR_TOP/patch/115/import/alr.lct

/*You can use some additional parameters such as*/

* ALR_DISTRIBUTION_LISTS APPLICATION_SHORT_NAME=AD where           APPLICATION_SHORT_NAME represents the Application Alert owner
* ALR_LOOKUPS
* ALR_MESSAGE_SYSTEMS
* ALR_ORACLE_MAIL_ACCOUNTS
* ALR_PROFILE_OPTIONS
* ALR_PERIODIC_SETS APPLICATION_SHORT_NAME=ALR

AME RULES:
CONDITIONS:
The script that downloads AME conditions allows you to download all conditions for a given transaction type or only those associated with a particular attribute or group of attributes.

DOWNLOAD
FND_TOP apps/ 0 Y DOWNLOAD $PER_TOP/patch/115/import/amesconk.lct AME_CONDITIONS CONDITION_KEY= TRANSACTION_TYPE_ID=
APPLICATION_SHORT_NAME=

UPLOAD
FNDLOAD apps/@destinationdb 0 Y UPLOAD $PER_TOP/patch/115/import/amesconk.lct

Dynamic Approval group /Approver Groups:

An approver group can either be an ordered set of one or more approvers (persons and/or user accounts) or it can be a list, which is dynamically generated at rule evaluation time.

DOWNLOAD
FND_TOP apps/ 0 Y DOWNLOAD $PER_TOP/patch/115/import/amesappg.lct AME_APPROVAL_GROUPS APPROVAL_GROUP_NAME= TRANSACTION_TYPE_ID=
APPLICATION_SHORT_NAME=

UPLOAD
FNDLOAD apps/@destinationdb 0 Y UPLOAD $PER_TOP/patch/115/import/amesappg.lct

Dynamic Approval group config:

DOWNLOAD
FNDLOAD apps/@sourcedb 0 Y DOWNLOAD $PER_TOP/patch/115/import/amesaagc.lct ameapprovalgroupusage.ldt AME_APPROVAL_GROUP_CONFIG APPROVAL_GROUP_NAME='Dyn. Post HROPs Approval Group' TRANSACTION_TYPE_ID='HRSSA' APPLICATION_SHORT_NAME='PER'

UPLOAD
FNDLOAD apps/@destinationdb 0 Y UPLOAD $PER_TOP/patch/115/import/amesaagc.lct ameapprovalgroupusage.ldt

AME Rule: 

An approval rule is a business rule that helps determine a transactional approval process. Rules are constructed from conditions and actions.
The AME rules can be downloaded for information about the rule (e.g. name, description, etc) along with associated conditions and rule type.

DOWNLOAD
$FND_TOP/bin/FNDLOAD apps/ 0 Y DOWNLOAD $PER_TOP/patch/115/import/amesrulk.lct AME_RULES RULE_KEY= TRANSACTION_TYPE_ID=
APPLICATION_SHORT_NAME=

# You can find Rule Key in AME_RULES table

UPLOAD
FNDLOAD apps/@destinationdb 0 Y UPLOAD $PER_TOP/patch/115/import/amesrulk.lct XX_FILE_NAME.ldt

AME Rule Action Type Usage:

DOWNLOAD
FNDLOAD apps/ 0 Y DOWNLOAD amesactu.lct .ldt AME_ACTION_USAGES APPLICATION_SHORT_NAME= TRANSACTION_TYPE_ID= [RULE_KEY=]

# Rule Key is found in AME_RULES table

UPLOAD
FNDLOAD apps/apps 0 Y UPLOAD amesactu.lct .ldt

Transaction Types:
An application that uses AME to govern its transactions approval processes is termed an integrating application. An integrating application may divide its transactions into several categories where each category requires a distinct set of approval rules. Each set of rules is called a transaction type. Different transaction types can use the same attribute name to represent values that are calculated in different ways or fetched from different places.

DOWNLOAD
FNDLOAD apps/ 0 Y DOWNLOAD amescvar.lct .ldt AME_CALLING_APPS APPLICATION_SHORT_NAME= TRANSACTION_TYPE_ID=

UPLOAD
FNDLOAD apps/ 0 Y UPLOAD amescvar.lct .ldt

Attribute:


DOWNLOAD
FNDLOAD apps/ 0 Y DOWNLOAD $PER_TOP/patch/115/import/amesmatt.lct AME_ATTRIBUTES ATTRIBUTE_NAME= TRANSACTION_TYPE_ID=
APPLICATION_SHORT_NAME=

UPLOAD
FNDLOAD apps/ 0 Y UPLOAD amesmatt.lct .ldt

Attribute Usage:

DOWNLOAD
FNDLOAD apps/ 0 Y DOWNLOAD $PER_TOP/patch/115/import/amesmatr.lct .ldt AME_ATTRIBUTE_USAGES ATTRIBUTE_NAME= TRANSACTION_TYPE_ID=
APPLICATION_SHORT_NAME=

UPLOAD
FNDLOAD apps/ 0 Y UPLOAD amesmatr.lct .ldt

WEB ADI integrator:
FNDLOAD apps/ @ 0 Y DOWNLOAD $BNE_TOP/patch/115/import/bneint.lct BNE_INTEGRATORS INTEGRATOR_ASN= "PER" INTEGRATOR_CODE=<"Integrator code">

Web ADI contents:
FNDLOAD apps/ @0 Y DOWNLOAD $BNE_TOP/patch/115/import/bnecont.lct BNE_CONTENTS CONTENT_ASN="PER" CONTENT_CODE=<"Content code">

Web ADI mappings:
FNDLOAD apps/ @0 Y DOWNLOAD $BNE_TOP/patch/115/import/bnemap.lct BNE_MAPPINGS MAPPING_ASN="PER" MAPPING_CODE=<"mapping code">

Web ADI layout:
FNDLOAD apps/ @0 Y DOWNLOAD $BNE_TOP/patch/115/import/bnelay.lct BNE_LAYOUTS LAYOUT_ASN="PER" LAYOUT_CODE =

Web ADI parameter list:
FNDLOAD apps/ @0 Y DOWNLOAD $BNE_TOP/patch/115/import/bneparamlist.lct< file name> BNE_PARAM_LISTS PARAM_LIST_ASN="PER" PARAM_LIST_CODE=<"parameter list code">

WEB ADI component:
FNDLOAD apps/ @0 Y DOWNLOAD $BNE_TOP/patch/115/import/bnecomp.lct BNE_COMPONENTS COMPONENT_ASN="PER" COMPONENT_CODE=<"Component code">

Post-Accounting Programs SLA:
Downloading Post-Accounting Programs using the following syntax:

FNDLOAD /[@connect]0 Y DOWNLOAD @XLA:patch/115/import/xlapgseed.lct XLA_POST_ACCT_PROGS APPLICATION_ID=

Uploading Post-Accounting Programs using the following syntax:

FNDLOAD /[@connect]0 Y UPLOAD @XLA:patch/115/import/xlapgseed.lct

Work Flows:


Download
WFLOAD apps/$CLIENT_APPS_PWD 0 Y DOWNLOAD

Upload
WFLOAD apps/$CLIENT_APPS_PWD 0 Y UPLOAD


Challa.

Wednesday, November 26, 2014

Creating Table valuesets from backend in oracle applications

1) Creation of value set through API :

BEGIN

/*You need to initialize the session mode before the call*/ 
FND_FLEX_VAL_API.SET_SESSION_MODE('customer_data');/*Mandatory*/ 
FND_FLEX_VAL_API.CREATE_VALUESET_TABLE
(
 VALUE_SET_NAME =>'PO_TEST_VALUE_SET',
 DESCRIPTION =>'createdfrombackend',
 SECURITY_AVAILABLE =>'N',
 ENABLE_LONGLIST =>'N',
 FORMAT_TYPE   =>'Char',
 MAXIMUM_SIZE =>20,
 precision => NULL,
 numbers_only =>'N',
 uppercase_only  =>'N',
 right_justify_zero_fill =>'N',
 min_value  => NULL,
 MAX_VALUE   => NULL,
 TABLE_APPLICATION => 'Purchasing',
 table_appl_short_name =>'PO' ,
 TABLE_NAME =>'PO_REQUISITION_HEADERS PRH',
 ALLOW_PARENT_VALUES =>'N',
 VALUE_COLUMN_NAME =>'PRH.SEGMENT1',
 VALUE_COLUMN_TYPE  =>'Char',
 value_column_size  =>20,
 meaning_column_name  => NULL,
 meaning_column_type  => NULL,
 MEANING_COLUMN_SIZE  => NULL,
 ID_COLUMN_NAME    =>NULL,--'PRH.SEGMENT1',
 ID_COLUMN_TYPE   =>NULL,--'Char',
 ID_COLUMN_SIZE   =>null,--u20,
 WHERE_ORDER_BY    =>'where rownum<=100',
 ADDITIONAL_COLUMNS => NULL
  );
commit;
  Exception
  WHEN OTHERS THEN
  dbms_output.put_line(sqlerrm);
  end;

After executing the above code it will generate a message saying Anonymus Block created. To verify that if it is created. Please check the table Fnd_Flex_Value_Sets

select * 

from fnd_flex_value_sets 
where flex_value_set_name = 'PO_VALUE_SET';


2) Deletion of Valueset can be done by executing the below code :

BEGIN
FND_FLEX_VAL_API.DELETE_VALUESET(VALUE_SET => 'PO_VALUE_SET');
END;

This will delete the Valueset.

3) Query to extract all the valusets :

/*Query to extract all the valuesets*/
SELECT FFVS.FLEX_VALUE_SET_ID ,
FFVS.FLEX_VALUE_SET_NAME ,
FFVS.DESCRIPTION SET_DESCRIPTION ,
FFVS.VALIDATION_TYPE,
FFV.FLEX_VALUE,
FFVT.DESCRIPTION VALUE_DESCRIPTION,
FFV.ENABLED_FLAG,
FFV.LAST_UPDATE_DATE,
FFV.LAST_UPDATED_BY,
FFV.ATTRIBUTE1,
FFV.ATTRIBUTE2,
FFV.ATTRIBUTE3 --INCLUDE ATTRIBUTE VALUES BASED ON DFF SEGMENTS
FROM FND_FLEX_VALUE_SETS FFVS ,
            FND_FLEX_VALUES FFV ,
            FND_FLEX_VALUES_TL FFVT
WHERE
FFVS.FLEX_VALUE_SET_ID = FFV.FLEX_VALUE_SET_ID
AND FFV.FLEX_VALUE_ID = FFVT.FLEX_VALUE_ID
AND FFVT.LANGUAGE = USERENV('LANG')
AND FLEX_VALUE_SET_NAME LIKE 'VALUE_SET_NAME'
ORDER BY FLEX_VALUE ASC;


Challa.